반응형
(실습) 4개의 shard를 만들어 샤딩함
샤딩의 개념을 모르겠을 경우 이전 글 참고
2021.12.04 - [DataBase/MongoDB] - [ MongoDB ] 샤딩(Sharding)이란?
[ MongoDB ] 샤딩(Sharding)이란?
샤딩이란? 데이터를 분산하여 저장하는 개념 한대의 서버에 빅데이터를 저장하게 되면 I/O가 한대에서 일어남. 서버를 여러 개를 두고 분산 저장한다면 I/O 가 여러 대에서 일어나기 때문에 효율
dev-cini.tistory.com
기본적으로 필요한 폴더 구조 생성
1. D 드라이브에 Mongolab 폴더 생성

- 원하는 C,D,E 드라이브를 골라서 폴더를 하나 만들어 줌
2. mongolab 폴더 안에 shard1,2,3,4 폴더 생성

3. mongolab 폴더 안에 comfig1,2,3 폴더 생성

- config 서버 저장 폴더 생성
- config1,2,3,4 폴더 생성(서버 뻗을시 나머지 하나로 서버 실행하기 위해 4개 생성)
4. 각각의 shard1, 2, 3, 4 안에 shardRep1, 2, 3 폴더 생성

5. 각각의 shard1, 2, 3, 4 안에 data 폴더 생성

명령어 실행
1. config 서버 실행 (각각 cmd로 실행)
mongod --configsvr --replSet configRepl --dbpath D:\mongolab\config1 -port 20001
mongod --configsvr --replSet configRepl --dbpath D:\mongolab\config2 -port 20002
mongod --configsvr --replSet configRepl --dbpath D:\mongolab\config3 -port 20003
1 -1 CMD 실행 창 (각각 실행 3개)

2. config 서버 접속 및 리플리카 셋 설정(replSet : 복제본 생성)
mongo localhost:20001
# config01 server 접속
var config = {
  _id : "configRepl", members : [
    {_id : 0, host : 'localhost:20001'},
    {_id : 1, host : 'localhost:20002'},
    {_id : 2, host : 'localhost:20003'}
  ]
}
rs.initiate(config)

exit
# 설정 후 접속한 서버가 primary 서버로 바뀐 것을 확인 할 수 있다.
2 -1 CMD 실행 창


2 -2 exit로 종료 후 다시 접속 시 (20001,20002,20003)

- mongo localhost:20001로 접속 → configRepl:PRIMARY>
- mongo localhost:20002로 접속 → configRepl:SECONDARY>
- mongo localhost:20003로 접속 → configRepl:SECONDARY>
※ 복제본을 생성시 한개의 Primary서버와 나머지는 secondary서버로 설정됨.
Primary서버가 무조건 먼저 실행 서버다운이나 고장 시 secondary서버 실행.
3. shard 서버 구성을 위한 리플리카 셋 설정 : 서버 실행 (총 12개의 서버(cmd)를 실행)
mongod --shardsvr --replSet shardRep1 --dbpath D:\mongolab\shard1\shardRep1\data -port 30011
mongod --shardsvr --replSet shardRep1 --dbpath D:\mongolab\shard1\shardRep2\data -port 30012
mongod --shardsvr --replSet shardRep1 --dbpath D:\mongolab\shard1\shardRep3\data -port 30013

mongod --shardsvr --replSet shardRep2 --dbpath D:\mongolab\shard2\shardRep1\data -port 30021
mongod --shardsvr --replSet shardRep2 --dbpath D:\mongolab\shard2\shardRep2\data -port 30022
mongod --shardsvr --replSet shardRep2 --dbpath D:\mongolab\shard2\shardRep3\data -port 30023

mongod --shardsvr --replSet shardRep3 --dbpath D:\mongolab\shard3\shardRep1\data -port 30031
mongod --shardsvr --replSet shardRep3 --dbpath D:\mongolab\shard3\shardRep2\data -port 30032
mongod --shardsvr --replSet shardRep3 --dbpath D:\mongolab\shard3\shardRep3\data -port 30033

mongod --shardsvr --replSet shardRep4 --dbpath D:\mongolab\shard4\shardRep1\data -port 30041
mongod --shardsvr --replSet shardRep4 --dbpath D:\mongolab\shard4\shardRep2\data -port 30042
mongod --shardsvr --replSet shardRep4 --dbpath D:\mongolab\shard4\shardRep3\data -port 30043
각각 실행 해야하기 때문에 총 12개의 서버 즉 CMD창을 12개 켜야한다..
너무 많기 때문에 어떻게하는지 해보고 싶은경우 서버 수를 줄여서 실습하면 된다.
3 - 1 CMD실행창

4. 각각의 리플리카 셋 서버 접속 및 설정(rs.status() 명령어로 설정된 리플리카 셋 설정 정보를 확인)
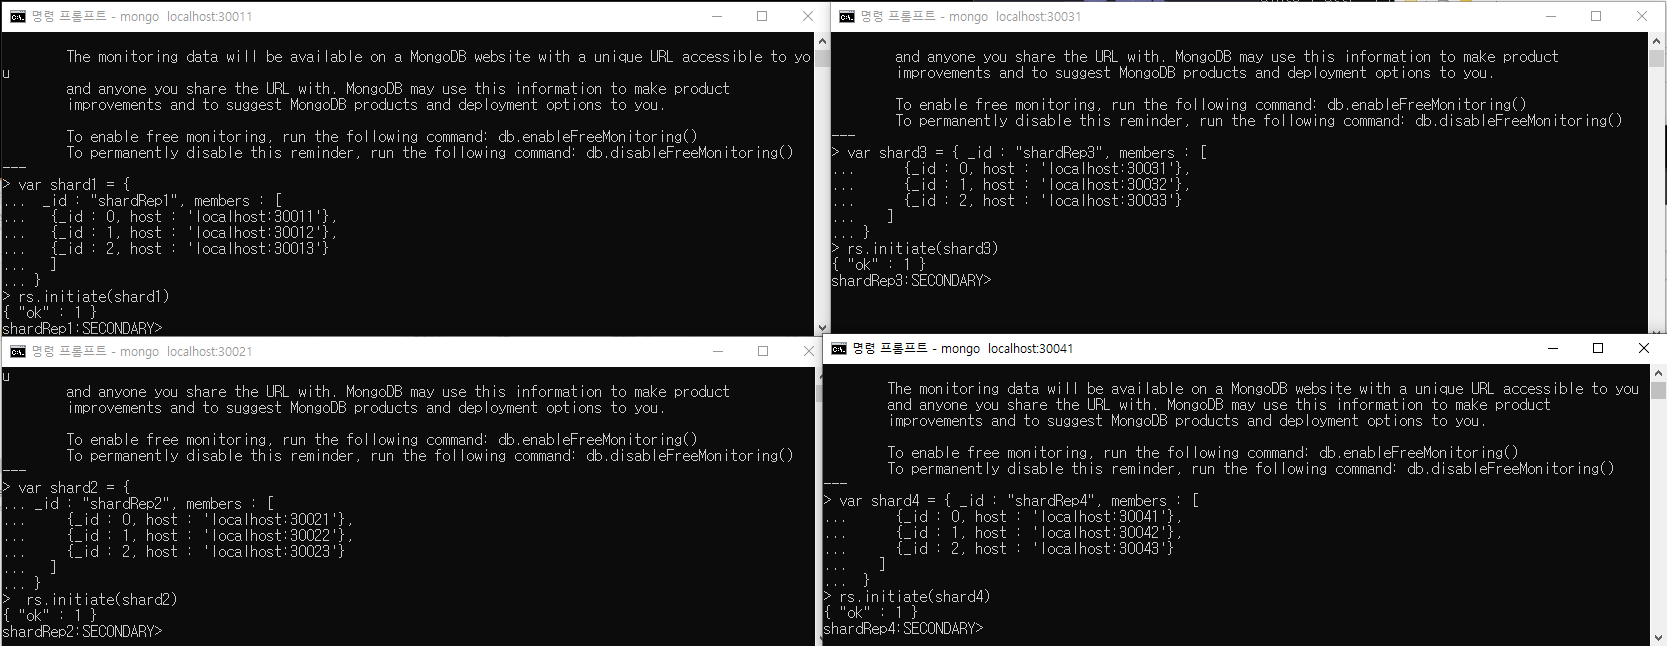
mongo localhost:30011

var shard1 = {
 _id : "shardRep1", members : [
  {_id : 0, host : 'localhost:30011'},
  {_id : 1, host : 'localhost:30012'},
  {_id : 2, host : 'localhost:30013'}
  ]
}
rs.initiate(shard1)


mongo localhost:30021

var shard2 = {
_id : "shardRep2", members : [
    {_id : 0, host : 'localhost:30021'},
    {_id : 1, host : 'localhost:30022'},
    {_id : 2, host : 'localhost:30023'}
  ]
}
 rs.initiate(shard2)


mongo localhost:30031

var shard3 = { _id : "shardRep3", members : [
     {_id : 0, host : 'localhost:30031'},
     {_id : 1, host : 'localhost:30032'},
     {_id : 2, host : 'localhost:30033'}
   ]
}
rs.initiate(shard3)


mongo localhost:30041

var shard4 = { _id : "shardRep4", members : [
     {_id : 0, host : 'localhost:30041'},
     {_id : 1, host : 'localhost:30042'},
     {_id : 2, host : 'localhost:30043'}
   ]
 }
rs.initiate(shard4)
※ rs.status() : 명령어로 설정된 리플리카 셋 설정 정보를 확인 할 수 있음
4.-1 실행창
5. Mongos(shard 서버) 설정(위에서 설정한 config 서버를 각 실행해둔다)
mongos --configdb configRepl/localhost:20001,localhost:20002,localhost:20003,localhost:200046. Sharding 설정 (새로운 cmd 창에 mongo 입력하면 mongos로 접속이 됨)
mongo
7. 샤드 설정(데이터 분산 저장할 컴퓨터 설정과 같음)
sh.addShard("shardRep1/localhost:30011")
sh.addShard("shardRep2/localhost:30021")
sh.addShard("shardRep3/localhost:30031")
sh.addShard("shardRep4/localhost:30041")
8. 샤드 db 등록
sh.enableSharding("test")
9. 샤딩시킬 collection의 인덱싱 설정
use test
db.things.createIndex({empno:1})
10. 샤드 콜렉션 셜정(admin)
use admin
sh.shardCollection("test.things",{empno:"hashed"})
11. 테스트 데이터 삽입
use test

# 데이터 만개 저장 (십만개~십일만개)
for(var n = 0; n<10000; n++){
  db.things.insert({empno : n, ename : 'test', sal : 1000})
}

# 데이터 갯수 확인
db.things.count()
12. 데이터가 분산되었는지 확인
mongo localhost:30011
use test
db.things.count()
exit

mongo localhost:30021
use test
db.things.count()
exit

mongo localhost:30031
use test
db.things.count()
exit

mongo localhost:30041
use test
db.things.count()
exit
12-1 CMD 실행창

반응형
'DataBase > MongoDB' 카테고리의 다른 글
| [ MongoDB ] 샤딩(Sharding)이란? (0) | 2021.12.04 |
|---|---|
| [MongoDB] 무료 몽고디비(MongoDB) Atlas (0) | 2021.10.19 |